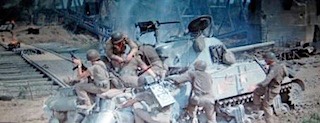
Once beyond the railroad yard, the Sherman’s need to cross the Railroad bridge which is blown up right before their eyes. In a café 10 miles south of Mesurier, Oddball calls up Sgt Bellamy of the 42nd Army Corps of Engineers to build 60 feet of bridge behind enemy lines. For a piece of the action, Sgt Bellamy creates Oddball’s Army and they rendezvous with Kelly at Grid Section B that night. The next morning they fight for the Big Bridge. [Note: the Germans have already put up a pontoon bridge next to the broken Railroad Bridge.]
This pontoon bridge has been damaged by US planes this morning. Before the barrage, it will support the first vehicle over (other than a jeep), but cracking strains are heard. After that, the next vehicle (other than a jeep) over has a chance of ruining the bridge. Use Bridge Strength table below for vehicle passing until the barrage starts. After that, use bridge Rep Rating in Barrage Rules.
Bridge Engagement starts with attack on the 3 German squads guarding the bridge. These guards will defend until 50% of their forces are OOF or run-away, then they will check morale individually. (Note: this is KH specific and not part of the NUTS! rules.) Those Germans surviving that morale check will check once again at 75%, then they retreat to the others side of the hill. A barrage on the pontoon bridge will come down in 1d6+1 turns after they retreat. The German Infantry will try to block the pontoon bridge.
Artillery Barrage
This is to represent an active artillery barrage on an area. In this case, it’ll be used as motivation to get Kelly and Oddballs tanks across the river if they haven’t already.
1) Start Barrage: Roll activation dice every turn, then do your moves. There will be no Germans left in the area unless they are OOF, so they have no move.
2) If doubles are rolled, there is a chance that someone got hit. Everyone roll their Rep on table below. [Bombs are going off left and right, doubles represents the chance of getting hit in the “1/2 hour” barrage, not the accuracy of this particular turn.]
3) The pontoon bridge is divided into 4 segments and has REP 4 and each hit in that segment lowers REP by 1.
For purposes of this bridge, a tank can go over Rep 4. On a Rep 3 section, it needs a Run-over Table (Vehicle Reaction Test QRS in back of NUTS! 2nd Edition) Only troopers can go over REP 2 bridge and REP 1 is rough terrain. Barrage will last 12 rounds. [This is modified Artillery Barrage Effects table on page 37 Nuts 1st Edition.]
Barrage!
Roll 2d6 vs the Rep+1 of each figure, vehicle and the bridge on the board, at the start of the barrage.
2 KH ARTILLERY BARRAGE EFFECTS (APR 7 or 9)
2d6 vs. Rep
Figures in cover or open topped AFV’s add another +1 to Rep.
Pass 2d6
* No Effect
Pass 1d6
* Duck Back
Pass 0d6
* The casualty is knocked down and must take “Recover from Knock Down” test at -1 Rep due to seriousness of artillery frags.
* In addition, each vehicle on the table is subject to a KH Hands of Fate attack, a variation of NUTS! 2nd Edition page 49. On a roll of “2”, any vehicle with a top AR of less than 2 is destroyed, while those with an AR of 2 or higher is disabled.
Whether Kelly’s troops are on foot or vehicle, they are fighting to get across a bridge with any of Oddball’s tanks and (per Kelly) without the Support Units. Any Support Units (Oddball’s Army) that make it across with Kelly’s crew will wait for orders from the respective commanders before leaving for Clermont.
This river can’t be forded as it is more than 4 feet (real world) deep.
For passing of time, KH Hours are an arbitrary 20 turns long.
If ally troops are there longer than an hour (which includes the first barrage), a counter-attack of a German platoon ensues. You may skip this counter-attack if you wish to get on with Clermont. The German counter-attack comes from the ridge at Point 6 on the map.
If the bridge is repaired in 5 hours (new rules below), Oddball’s Army may go to Clermont. If there is a stalemate at the bank, the remnants of Oddball’s Army can turn the tide. If Kelly lost, then Oddball’s Army can have a crack at it.
On hour 3, roll 1d6. This is the number of hours it will take for General Colt to arrive and pass through. You might just make it before he arrives. If not, “16 million bucks, shot!”
If you played “Hilltop”, remember your salvage limitations. There is a chance that before this battle, the Heroes got supplies from Oddball’s Army. Roll 1d6 vs Kelly’s Rep-2. If successful, you are replenished. If not, you continue your limitations.
Bridge Map
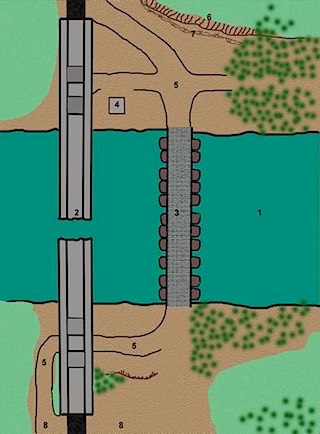
1) River 2) Damaged Railroad Bridge 3) Pontoon Bridge 4) Concrete Building 5) Dirt Road 6) Ridge 7) Barbed Wire 8) Allies Enter Here
